Español
 Français
 China
China
Choosing Stripping Pin Layout for Your Full Stripping Roll Die Cutting Machine
You’ve just set up a run of pizza boxes on your full stripping roll die cutting line. The die cutting is clean, the registration is spot on—but the waste won’t clear. Stripping pins that aren’t configured correctly leave bits of paperboard clinging to the box blanks, slowing down production and causing rejects.
The layout of stripping pins directly affects waste removal efficiency and tool life. Paper boxes come in many shapes—rectangular, hexagonal, with windows, with handles—and each requires a different stripping pin configuration. Your Full Stripping Roll Die Cutting Machine is capable of handling all of them, but only if the pins are set up right.
This article walks you through how stripping pins work, the factors that determine pin placement, three common configuration patterns, and how to adjust pin height for different paper grades. For technicians and production supervisors, this is practical guidance for reducing setup time and improving waste removal on your line.
Understanding How Stripping Pins Work
Before you start placing pins, you need to understand what they actually do.
Pushing Waste Out, Not Pulling
Stripping pins work by pushing waste material out of the die-cut blank—not by pulling it. The pin pushes down on the waste piece after the die cutting is complete, separating it from the finished box. This push action is more effective and gentler on the material than pulling, which can tear or distort the box.
Pin Diameter and Tip Shape Options
The diameter and tip shape of the pin determine how effectively it removes waste. Larger pins work better for large waste areas, while smaller pins are needed for tight spaces. Feida Machinery’s stripping pins are designed to be very strong, saving time when pins need to be changed. The tip shape—flat, pointed, or rounded—affects how the pin contacts the waste. For most paperboard applications, a flat or slightly rounded tip provides the best balance of push force and surface protection.
The Stripping Cylinder and Servo Control
The stripping cylinder is controlled by a servo motor that strips exactly. This precision control ensures that each pin applies the right amount of force at the right time. The servo-driven system can handle different products according to customer requirements, making it adaptable to a wide range of box shapes and sizes.
Factors That Determine Stripping Pin Placement
Where you place the pins is just as important as how many you use.
Box Complexity – Windows, Cutouts, and Fold Lines
A simple rectangular box needs a perimeter layout—pins around the outside edge of the blank. A box with a window or internal cutout needs pins in the interior waste areas as well. Fold lines also affect placement: pins too close to a fold line can crease or damage the box. The rule is simple: place pins where waste needs to be pushed out, and keep them away from areas that need to stay intact.
Paperboard Thickness and Fluting Direction
Thicker paperboard requires more pin force and often more pins. Corrugated board—especially E-flute and B-flute—has a fluting direction that affects how waste separates. Pins placed perpendicular to the fluting direction tend to work better than pins placed parallel to it. The FDQF series handles paper gram weights from 180-600g/㎡, covering everything from lightweight paperboard to heavy corrugated.
Machine Stripping Stroke Length
The stripping stroke length determines how far the pins travel. A longer stroke gives the pins more time to push the waste clear, but it also slows down the cycle. The FDQF series runs at 80-120 times per minute, with the ZBQF series reaching 100-180 times per minute. Matching the stroke length to the production speed and box complexity is key to efficient waste removal.
Three Common Pin Configurations and When to Use Them
There are three basic configuration patterns. Each works for a different type of box.
Perimeter Pattern – For Simple Rectangular Boxes
The perimeter pattern places pins around the outside edge of the box blank. This is the simplest and most common configuration. It works for rectangular boxes like pizza boxes, shipping cartons, and standard product packaging. Pins are spaced evenly around the perimeter, with additional pins at corners where waste tends to cling.
Island Pattern – For Boxes with Internal Waste Areas
The island pattern places pins in the interior waste areas—windows, cutouts, and holes. These internal waste pieces can’t be removed by perimeter pins alone. Island pins push the waste out from the inside. This configuration is essential for boxes with display windows, handle cutouts, or any internal opening. Feida’s machine can be customized to handle the stripping of all kinds of different products according to customer requirements.
Hybrid Pattern – For Irregular Shapes
The hybrid pattern combines perimeter and island configurations. It’s used for irregular shapes—boxes with die-cut handles, hexagonal boxes, or any box that doesn’t fit neatly into the other two categories. The hybrid pattern places pins on the perimeter, in interior waste areas, and anywhere else waste needs to be pushed out. Custom die shapes can be designed for any food packaging shape.
| Configuration | Best For | Pin Placement |
|---|---|---|
| Perimeter | Simple rectangular boxes | Around outside edge |
| Island | Boxes with windows, cutouts, holes | In internal waste areas |
| Hybrid | Irregular shapes, die-cut handles | Perimeter + interior + custom spots |
How to Adjust Pin Height for Different Paper Grades
Pin height is critical. Too high and the pin marks the box surface. Too low and it doesn’t push the waste clear.
The “Paper Thickness Plus 0.5mm” Rule
A good starting point for pin height is the paper thickness plus 0.5mm. For a 300g/㎡ paperboard that’s about 0.4mm thick, set the pin height to 0.9mm. This gives the pin enough extension to push the waste clear without bottoming out on the anvil. The FDQF series handles paper from 180-600g/㎡, so the pin height needs to be adjusted for each paper grade.
Using Plastic Shims to Fine-Tune Individual Pins
Not all pins need to be exactly the same height. If you have a particularly stubborn waste area, you can add a plastic shim under the pin to increase its height slightly. This is a quick, low-cost way to fine-tune the configuration without replacing the pins. The goal is to get all pins pushing evenly—no high spots, no low spots.
Testing with Colored Waste Paper
Before you run a full production batch, test your pin configuration with colored waste paper. Run a short batch—50 to 100 sheets—and inspect the waste removal. If you see waste still clinging to the blanks, adjust the pin height or placement. This simple test saves time and material compared to running a full batch and discovering the problem afterward.
Observing Waste Ejection Trajectory
Watch where the waste goes after it’s pushed out. If it’s landing in a pile that’s easy to clear, your configuration is working. If it’s scattering or getting caught in the machine, you may need to adjust the pin placement or add additional pins to change the ejection trajectory. The waste is taken down into an iron box automatically by air, so smooth ejection is important for reliable operation.
Questions Technicians Ask
Can I use the same pins for E-flute and B-flute corrugated?
No. E-flute (thinner, finer flutes) and B-flute (thicker, coarser flutes) have different thicknesses and structural properties. E-flute requires shorter pins with less force to avoid crushing the board. B-flute needs longer pins with more force to push through the thicker material. Always adjust pin height and force when switching between flute types.
How do I prevent pins from marking the box surface?
Pin marks are usually caused by excessive force or incorrect pin height. If you see marks on the finished box surface, reduce the pin height slightly or add a soft pad (felt or rubber) between the pin and the waste. The pad cushions the impact while still pushing the waste clear. Feida’s machine includes pneumatic lock plate and overload protection to help prevent damage.
When should I rotate or replace pins?
Replace pins when they show signs of wear: rounded tips that don’t push cleanly, bent shafts, or visible damage. Rotate pins periodically—every 500,000 cycles or so—to distribute wear evenly. Feida’s stripping pins are very strong, saving much time to change broken pins, but even the strongest pins need replacement eventually. Keep a log of pin changes to track wear patterns.
Building a Stripping Configuration Log
A good configuration is worth documenting. Here’s how to make it last.
Record Every Successful Setup
When you find a pin configuration that works—clean waste removal, no marks, good production speed—write it down. Record the paper grade, box shape, pin positions, pin heights, and any shims used. The next time you run the same box, you can set up in minutes instead of hours.
Use the Machine’s Control Interface
The FDQF series uses a micro-computer and human-computer control interface. This interface can store settings for different jobs. Take advantage of it. Save each configuration under a job name so you can recall it with a few keystrokes.
Train Your Team
Make sure everyone on the shift knows how to set up pins and where to find the configuration log. Cross-training reduces downtime when the primary operator isn’t available. Feida provides on-site training and remote support for optimal stripping parameters, so your team can get up to speed quickly.
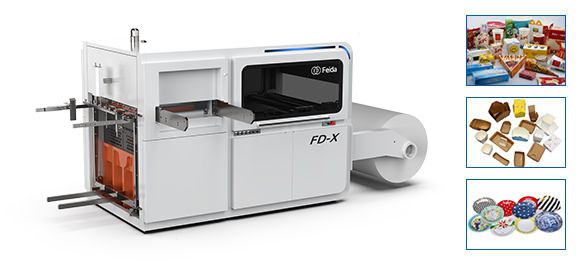
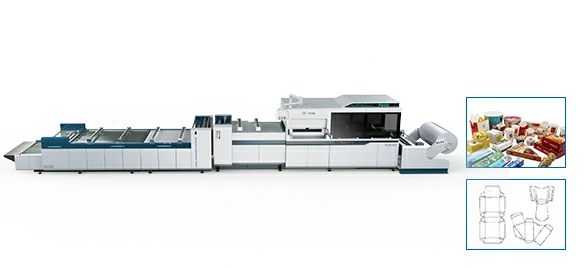
Feida Machinery manufactures full stripping roll die cutting machines designed for high-speed precision die cutting of various materials. The FDQF Full Automatic Stripping Roll Die Cutting Machine is widely used in the paper packaging field—for KFC paper boxes, McDonald’s paper boxes, Corona Beer packaging, and more. The machine features a servo motor control system for optimal performance, with all key components and controls from trusted international suppliers for high reliability.
Feida offers comprehensive support: high-precision CNC machine tools, a professional assembly and design team, customizable machines, installation and maintenance, remote troubleshooting, and 24-hour online consultation. They provide on-site training and remote support for optimal stripping parameters, and can customize die shapes for any food packaging shape.
Stripping pin configuration is one of those setup tasks that seems mysterious until you understand the principles. Once you do, it becomes straightforward: push the waste, not pull it; place pins where waste needs to clear; adjust height for the paper grade; test before full production; and document what works. With a systematic approach and a machine like the FDQF series from Feida, you can reduce setup time, improve waste removal, and keep your production line running smoothly.
Need help optimizing your stripping pin configuration? Reach out to Feida Machinery's technical team—they can provide setup guidance, custom die design, and on-site training to help you get the most from your full stripping roll die cutting machine.